Table of Contents
Well, you need to have a sturdy pair of cross country ski poles as you will be using your own locomotion to control the skis. They not only support your weight but they are your number one partner for powering yourself forward in a swift and efficient manner. However, having the wrong type, or wrong size of poles can completely exhaust your energy and ruin the experience.
If you intend to find the ideal pair of cross-country ski poles, firstly you need to know how to measure the correct pole length.
There are two equally acceptable ways to find the correct pole length for classic and skate cross-country skiing.
How to Size Cross Country Ski Poles – for Classic or Skate Style
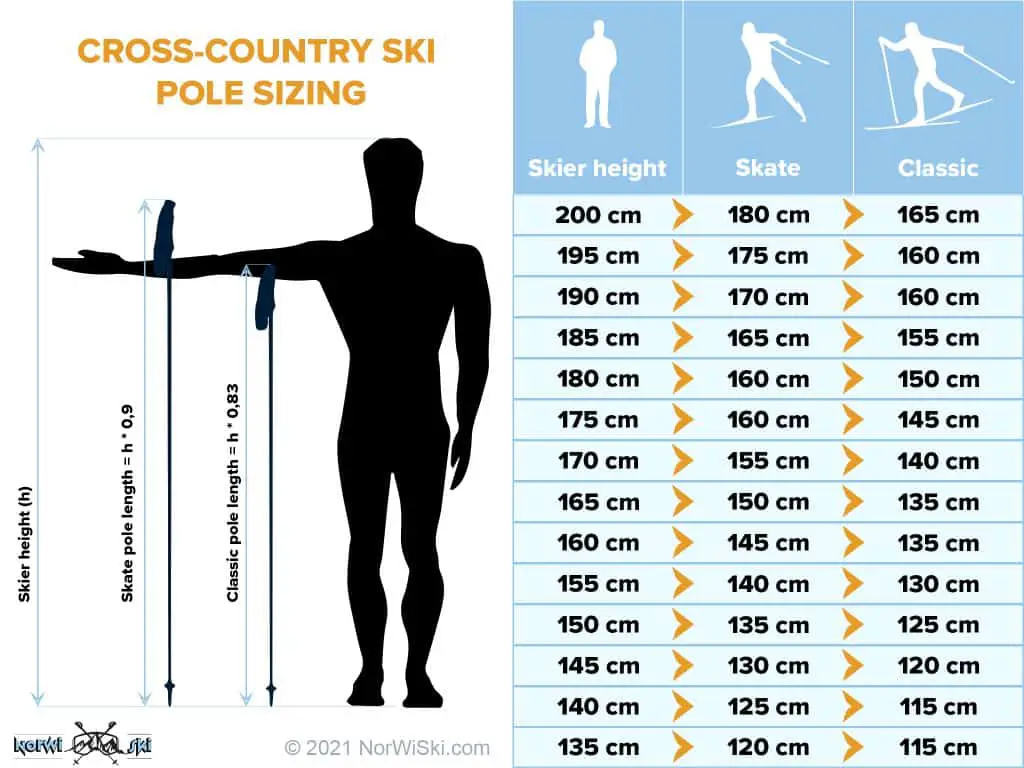
Measure your height while standing in boots, then calculate 83% of your body length, according to FIS regulations for classic cross-country skier athletes. For skate style cross-country skiers, the general rule is to add 10 centimeters (4 inches) to the above calculation or calculate 89% of their body length with boots on.
Classic Technique: Finding the Balance
For those who prefer the classic cross-country skiing technique, where skis move parallel to each other in groomed tracks, pole sizing plays a significant role. The correct pole length helps maintain balance and stability, especially when gliding and pushing off.
To determine the ideal pole length, follow these steps:
- Stand with Ski Boots: Wear your ski boots and stand on a flat surface. Hold the ski poles upside down, gripping just below the baskets.
- 90-Degree Angle: Bend your elbows at a 90-degree angle while holding the poles. Your upper arms should remain close to your body, and your forearms should be parallel to the ground.
- Grip Comfort: Adjust the pole length until your hands comfortably grip the handles while maintaining the 90-degree angle in your arms.
- Consider Terrain: Think about the type of terrain you’ll be skiing on. Longer poles might be beneficial for uphill sections, while slightly shorter poles could provide better control on downhills.
- Test and Adjust: Take your poles for a test on various terrains, including flat stretches and inclines. Ensure that the pole length allows for efficient movement and comfortable skiing.
Skating: Stride Efficiency
Skating technique in cross-country skiing involves a more dynamic motion, resembling ice skating. Here, pole length influences your stride efficiency and power transfer. To find the right pole size for skating:
- Booted Position: Stand with your ski boots on a level surface. Hold the poles with your hands placed slightly above the handles, ensuring your arms form a 90-degree angle.
- Skating Stride: Perform a skating-like motion with your arms, simulating the pole push and glide motion. Adjust the pole length so that your arms comfortably extend forward during the push phase.
- Trial and Adjustment: Similar to classic technique, test the poles on different terrains, focusing on diagonal skating strides. The correct pole length should enhance your push-off without causing discomfort.
Conclusion
Remember, personal preference also plays a role in pole length selection. Some skiers prefer slightly longer poles for increased power, while others opt for shorter poles for improved maneuverability. Additionally, consider your body proportions and skiing experience when making your decision.
Cross-country ski pole sizing is not a one-size-fits-all approach. The correct pole length can enhance your balance, stability, power transfer, and overall enjoyment of the sport. By following these guidelines and fine-tuning based on your experience, you’ll be well on your way to mastering the art of cross-country skiing, whether you prefer the classic technique or the dynamic skating style.